Showing posts with label Lighting. Show all posts

Wednesday, June 1, 2011

Exterior Lighting

   The same rules that govern interior lighting apply to the exterior spaces.
Exterior task lighting primarily provides safe night time access, around front door, garden paths and pool areas.The old large-sourced ambient lighting, (like multiple high wattage filament globes or spotlights) should be avoided. There are now many other more energy efficient and effective choices. Small 12V 10 watt halogen fixtures over or near the front door or along a path or staircase, will light enough of the traffic area to allow safe passage. The new extreme low wattage LED lights will do the same thing even more efficiently. Path lighting is best mounted on a wall or post, well below eye level, so that the source at no point blinds the traveller. Any close light source at night has a tendency to blind because the eye's pupil has adjusted wide open to very low levels.


When this task lighting is augmented with some feature lighting, (accenting particular plants, water features, stone walls), the path to the house becomes a passage of discovery.
Unlike interior rooms, the garden generally does not have a ceiling, so most fixtures would be mounted in the ground, providing up-lighting for plants and walls. While exterior feature lighting can be very attractive, one must be energy conscious and selective when deciding what to light. Not the entire garden needs to, or should be, lit up. Also consider how the exteriors lights impact on the neighbours. Some people (possible rightly) think that excess garden lighting is light pollution. Infrared sensors that turn lights on when needed are a worthwhile consideration.

Natural Lighting With a Skylight

     Skylights offer a number of benefits in that they can provide more lighting for your home, improve the ventilation, they look great if installed correctly, and they can help increase the value of the home. When choosing the right type of skylight, keep in mind that they should take up a minimum of 10% of the rooms total square footage. 


However, before you start cutting holes, you want to check with your local building code to ensure you choose the right type of skylight to coordinate with ventilation and natural light requirements.
Prior to starting the process of installing your new skylight, you want to have the actual skylight with you along with the instructions from the manufacturer. This will provide you with the rough dimensions and specific steps for installation. To get started, the opening will need to be located and marked. With a saber or drywall saw, you will start by cutting out a two-foot square test hole in the ceiling where you want the center of the skylight to go.
Next, look around the ceiling and roof framing to determine the best place for the opening location and consider plumbing and electrical installations. Now you want to position and then mark the opening, which will help minimize the amount of framing and joists needing to be cut. Using the saw, you will cut the opening along the guideline. Remove the ceiling material and then install your temporary bracing. Then, you want to cut through the ceiling joists and framing according to the skylight opening.
To frame the opening, you will double the last uncut joist on either side of the ceiling opening and then install double headers going across the opening with the ends to the cut joists sitting perpendicular. Using lumber that is the same depth as the ceiling framing, you will nail the trimmer joists to the frame the same as the opening for the light shaft. With 12d nails, go through the metal framing ties to connect the joists securely. The next step involves locating and marking the roof opening. To do this, hang a plumb bob at the bottom edge of the roof rafters, going down to each corner of the opening in the ceiling. These corner locations will be transferred vertically to the rafters, taking these points to the underside of the roof, as a way of locating the rough opening that will be cut through the roof. Next, drive a pilot nail through the roof at each of the corners at your proposed opening. Keep in mind that you want the corners to fall within the skylight curb framing.
Now the roof opening will need to be cut and framed. Typically, prefabricated skylights already have the curb assembly mounted. With this, you would take the assembly to the roof along with pilot nails that will be used as guides. If you have an asphalt-shingled roof, simply take a utility knife and cut along your marked lines, and then remove the shingles. Next, with a circular saw, you would cut through the sheathing. For wood-shingles, you will cut through the shingles and the roof together, placing a board beneath the board to allow the saw to glide freely. Remember to save the shingles for later. The roof opening will be framed by doubling the rafters at the sides of the roof opening, as well as the ends of the cut rafters. Now, install the double headers going across the opening at both ends.
To install your skylight, you would need to follow the manufacturer’s instructions, making sure it has been secured temporarily while you test the position. If the skylight is misaligned, not only would it be noticeable from the inside but it would also create risks for future leaks. With a level, you want to check the sill and then measure the diagonals to ensure the corners are square. Once done, the brackets will be screwed into the roof over a layer of building paper. To flash the curb and repair the roof, you will install an aluminum sill, head, and step flashing. Make sure you interweave the flashing and replacement shingles, as you move ahead. Then, apply roofing compound under the flashing and shingles.
     Finally, the shaft will be framed and the interior finished. You want the side of the shaft to be framed using 2×6s and then with an adjustable bevel gauge, mark, cut, and install the framing. The walls will now be insulated with R-19 fiberglass batts by stapling a 6-mil polyethylene vapor barrier on the inside sides. The shaft will be finished and then the joists taped with drywall tape and joint compound. Use 100-grit sandpaper or drywall sanding mesh to help smooth the joint compound and then apply the finish paint. The last step is to install wood molding, as a means of hiding the joint found between the drywall and skylight.

Monday, May 23, 2011

Adjust the Light in Kitchen

     Light is one of the important things that must be considered as to be able to cook would need adequate lighting. The light itself can be obtained from 2 sources, sunlight and lights.

       Sun Light
       Sunlight is very beneficial to kill germs in the kitchen. Since the kitchen garbage so often produced germ often appears in this room. In order to obtain sufficient sunlight, while trying to make the kitchen look at the number and size of the window or open space so they can get enough sunlight. With sufficient sunlight, meaning no need to turn on the lights in the daytime so that the saving in electricity usage.


      Lamplight
       Because sunlight is not available at all times, then the lamp light is also needed as a replacement light. There are 3 types of lights that can be used in the kitchen, namely:
  • Public Light
             Used to illuminate the kitchen, especially when there is no sunlight. The lighting should not be too dim or too bright so it can hurt the eyes.

 
  • Special Light
             Usually using halogen lamp and placed under the kitchen set. Used to illuminate specific areas, for example in a commonly used for cutting food materials so that the presence of these lights can be seen more clearly the color of food and determine the condition of food is it still good or not.

 
  • Light Accents
             Lighting is used to beautify the appearance of the kitchen. Generally placed in the cabinet on the door glass cabinet containing a display. With the presence of this lamp will certainly reinforce the beauty of the kitchen.

Thursday, May 19, 2011

Beautiful Field of Lights


     After you see this incredible outdoor lighting installation, you will yearn to change the cheap solar lights in your garden. Bruce Munro, a British lighting designer will  installing his iconic Field of Light again this winter at the Eden Project in the English county of Cornwall. This immense installation will use 6,000 acrylic tube lights containing optical fibers. The effect of so many small lights coming on at night is akin to the blooming of desert flowers after a rainstorm. The effect of the lights by a lake or pond is particularly lovely.
eden project2 Field of Lights : Bruce Munro
Munro was inspired to make his Field of Lights after a trip to the Australian desert years ago. He remembered stopping by roadside campsites each adorned with some large surreal sculpture like a giant banana or merino sheep. So, together with the blooming desert flowers, he thought he could make something surreal in the barren darkness of night.
eden project5 Field of Lights : Bruce Munro
The lights at the Eden Project will cover 60 meters x 20 meters using an incredible 24,000 meters of optical fibres.  In the works for next year is his massive illuminated maze synchronized with choral music called Water Towers at the Rook Lane Arts in Frome.

Wednesday, May 18, 2011

Creative and Classy Design

      Designed in vivid colors and spectacular shapes by Simone Micheli for La Murina, the CROSS+ Collection is a combination of Murano glass modules in different colors, and metal modules with different finishes. The column that surrounds the lighting source hangs from the ceiling all the way to just a few feet above the floor and offers the space it adores a very distinctive look along with an elegant appeal. Perfect for private residences, lounges and spacious entrance halls, it acts both as a vibrant lighting source and an attractive center piece. Creative and classy, it gives every room a personality and character of its own.

cross lighting 2 lighting


cross lighting 1 lighting 

modern lighting lamurina lighting

modern lighting design lighting

Crystal Lights by Eve Menz

       As they become a spectacular centerpiece all on their own, the amazing creations by designer Eve Menz seem to add a lot more to interior spaces than just light. Breaking away from tradition, the chandeliers seem to be borrowing origami patterns while taking vivid and vivacious shapes that vary from a vintage looking wooden finish to an ultra-modern crystalline design. While some look like drops of rain suspended in air and frozen in time, others spread romantic vibes with scarlet delights. But the best thing is that they look like potential DIY models. Either get yourself going or get the creative Eve Menz to do it for you. Simply adoring.


Amazing Bubble Models

     Fancy designer lighting can add a great deal of style to your home. One of the latest addittions to Italian company de Majo Illuminazione‘s  catalogue is the Babol collection – a series of modern suspension lamps. Babol, as its name suggests, uses the shape of a bubble to achieve a light and a very airy appearance. Different lamp models are distinguished by the number of “bubbles” used and their arrangement. This makes the modern lighting series suitable for various spaces and interior styles. Contemporary lighting at its finest.


babol lamp 2

babol lamp 3

babol lamp 1

Pendant Lamps by Alessandro Lenarda

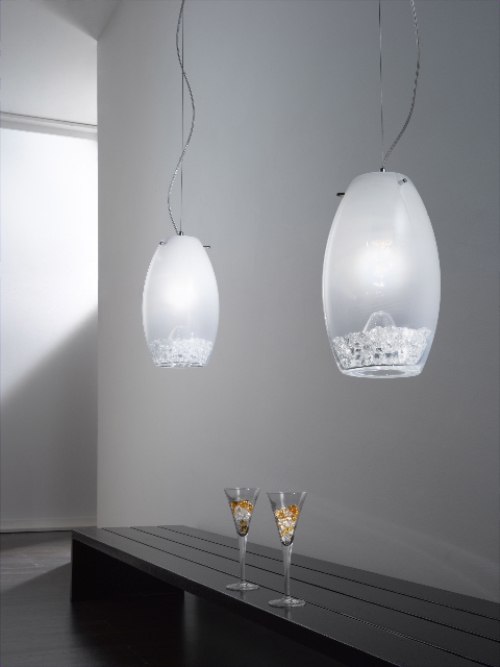
    Designer Alessandro Lenarda created an exquisite collection of pendant lamps called Reflex for Voltolina. It’s like a cloud of white glass with a metal chrome framing. Originally an octagon of crystal is incrusted with almost precious stones that reflect colors. Crystal, amber, red and black – these shades make the lamps more beautiful. The designer says that you may put almost everything inside to decorate your lamp – stones, sand, flowers and even water. This is like a canvas where you can paint anything you like. Incrust your lamp and play with your imagination! 


Friday, May 13, 2011

Adjust the lighting in your room

    Room is a place where we unwind after a day of work. Did you know that sleep drngan menyebabkab bright lights of your eyes can not rest?
Therefore adjust the lighting in your room so you can rest toal ..
What should I do?
  • Make sure you have a light sleep can also be configured bright and dim.


  • Do not choose a striking light color, like red, green, etc. .. This can damage your eyes.

Tuesday, July 13, 2010

Contemporary Interior Design Lighting Ideas

Contemporary Living Room LightingContemporary Living Room Lighting

In the atmosphere of the living room is one of the most important parts of your home has become, but people will often get confused, while the interior lighting . In this case, it is always, they suggested to go with the modern techniques of style, because there is a very simple but modern look of the living room. Of course, it is advisable for this simple but attractive lighting systems that go into the living room, modern lighting collections.

Contemporary Dining Room LightingContemporary Dining Room Lighting

Modern lights give your dining room a perfect combination of elegance and simplicity. Also due to their simple design, they are easy to maintain. Without further efforts, such as antique lighting is necessary for modern lighting and keep and maintain a functional dining room. Thanks to its simple exterior, and even a brush to clean these products do not have much time and effort. Because they are a compact design, they also add grace to your dining room and capacity for good lighting, also act as a primary source of light in the work area.

Contemporary Kitchen LightingContemporary Kitchen Lighting

The contemporary kitchen lights are the most popular lighting used in the kitchen developed in those days. Of these, the most frequently used lamps lighting kitchen geometric shape with clean lines. The best part for the modern kitchen lighting, which go well with any kind of simple home decor and the theme is moderately priced compared to the antique kitchen lighting systems.

Contemporary Bathroom LightingContemporary Bathroom Lighting

Bathroom lighting is available as bulbs in white, rounded dwellings made of glass, a strong influence on diffuse lighting illuminates the smallest imperfections of the face and help us to maintain easy to give. They are the best places by narrow valleys. It can be wall lights, light boxes in or near the bathroom cabinet light is used, but are usually located near the sinks.